
Zastanawiasz się, co to jest Terraform? Dowiedzmy się o tym.
Infrastructure as Code (IaC) to powszechna terminologia wśród specjalistów DevOps. Jest to proces zarządzania i udostępniania całej infrastruktury IT (składającej się zarówno z maszyn fizycznych, jak i wirtualnych) przy użyciu plików definicji odczytywalnych maszynowo. Jest to podejście inżynierii oprogramowania do operacji. Pomaga w automatyzacji całego centrum danych za pomocą skryptów programistycznych.
Ze wszystkimi funkcjami, jakie zapewnia Infrastructure as Code, wiąże się z wieloma wyzwaniami:
- Musisz nauczyć się kodować
- Nie znam wpływu zmiany.
- Musisz cofnąć zmianę
- Nie można śledzić zmian
- Nie można zautomatyzować zasobu
- Wiele środowisk dla infrastruktury
Terraform został stworzony, aby sprostać tym wyzwaniom.
Co to jest Terraform?
Terraforma to infrastruktura open-source jako narzędzie Code opracowane przez HashiCorp. Służy do definiowania i udostępniania całej infrastruktury za pomocą łatwego do nauczenia się języka deklaratywnego.
Jest to narzędzie do udostępniania infrastruktury, w którym można przechowywać konfigurację infrastruktury chmury jako kody. Jest bardzo podobny do narzędzi takich jak Tworzenie chmury, którego użyjesz do zautomatyzowania infrastruktury AWS, ale możesz go używać tylko w AWS. Dzięki Terraform możesz go używać również na innych platformach w chmurze.
Poniżej przedstawiamy niektóre korzyści płynące z używania Terraform.
- Czy orkiestracja, a nie tylko zarządzanie konfiguracją
- Obsługuje wielu dostawców, takich jak AWS, Azure, GCP, DigitalOcean i wielu innych
- Zapewnij niezmienną infrastrukturę, w której konfiguracja zmienia się płynnie
- Używa łatwego do zrozumienia języka, HCL (język konfiguracji HashiCorp)
- Łatwo przenośny do dowolnego innego dostawcy
- Obsługuje architekturę tylko klienta, więc nie ma potrzeby dodatkowego zarządzania konfiguracją na serwerze
Spis treści:
Koncepcje Terraform Core
Poniżej znajdują się podstawowe pojęcia/terminologie używane w Terraform:
- Zmienne: używane również jako zmienne wejściowe, jest to para klucz-wartość używana przez moduły Terraform w celu umożliwienia dostosowywania.
- Dostawca: jest to wtyczka do interakcji z interfejsami API usługi i uzyskiwania dostępu do powiązanych z nią zasobów.
- Moduł: Jest to folder z szablonami Terraform, w którym zdefiniowane są wszystkie konfiguracje
- Stan: składa się z buforowanych informacji o infrastrukturze zarządzanej przez Terraform i powiązanych konfiguracjach.
- Zasoby: Odnosi się do bloku jednego lub więcej obiektów infrastruktury (instancji obliczeniowych, sieci wirtualnych itp.), które są używane do konfigurowania i zarządzania infrastrukturą.
- Źródło danych: Jest implementowane przez dostawców w celu zwracania informacji o obiektach zewnętrznych do terraform.
- Wartości wyjściowe: Są to wartości zwracane przez moduł Terraform, które mogą być używane w innych konfiguracjach.
- Plan: Jest to jeden z etapów, w którym określa, co należy utworzyć, zaktualizować lub zniszczyć, aby przejść z rzeczywistego/aktualnego stanu infrastruktury do stanu pożądanego.
- Zastosuj: Jest to jeden z etapów, w którym stosuje zmiany rzeczywistego/bieżącego stanu infrastruktury w celu przejścia do pożądanego stanu.
Cykl życia terraformu
Cykl życia Terraform składa się z – inicjowania, planowania, stosowania i niszczenia.
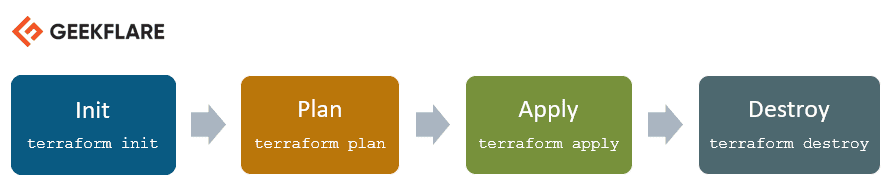
- Terraform init inicjuje katalog roboczy, który składa się ze wszystkich plików konfiguracyjnych
- Plan Terraform służy do tworzenia planu wykonania w celu osiągnięcia pożądanego stanu infrastruktury. Zmiany w plikach konfiguracyjnych są dokonywane w celu osiągnięcia pożądanego stanu.
- Terraform apply następnie dokonuje zmian w infrastrukturze zgodnie z definicją w planie i infrastruktura dochodzi do pożądanego stanu.
- Niszczenie Terraform służy do usuwania wszystkich starych zasobów infrastruktury, które są oznaczone jako skażone po fazie stosowania.
Jak działa Terraform?
Terraform składa się z dwóch głównych elementów składających się na jego architekturę:
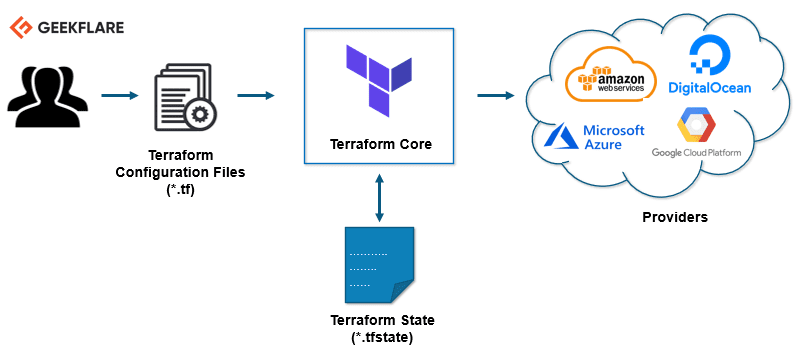
Rdzeń Terraformu
Rdzeń Terraform wykorzystuje do swojej pracy dwa źródła danych wejściowych.
Pierwsze źródło danych wejściowych to konfiguracja Terraform, którą jako użytkownik konfigurujesz. Tutaj określasz, co należy utworzyć lub udostępnić. Drugim źródłem danych wejściowych jest stan, w którym terraform utrzymuje aktualny stan aktualnej konfiguracji infrastruktury.
Zatem to, co robi terraform core, to pobiera dane wejściowe i ustala plan tego, co należy zrobić. Porównuje stan, jaki jest obecny stan i jakiej konfiguracji oczekujesz w efekcie końcowym. Określa, co należy zrobić, aby uzyskać pożądany stan w pliku konfiguracyjnym. Określa, co należy stworzyć, co zaktualizować, a co usunąć, aby stworzyć i udostępnić infrastrukturę.
Dostawcy
Drugim elementem architektury są dostawcy konkretnych technologii. Mogą to być dostawcy chmury, tacy jak AWS, Azure, GCP lub inna infrastruktura jako platforma usługowa. Jest także dostawcą bardziej zaawansowanych komponentów, takich jak Kubernetes lub innych narzędzi platformy jako usługi, a nawet oprogramowania jako narzędzia samoobsługowego.
Daje możliwość tworzenia infrastruktury na różnych poziomach.
Na przykład – utwórz infrastrukturę AWS, a następnie wdroż na niej Kubernetes, a następnie utwórz usługi/komponenty wewnątrz tego klastra Kubernetes.
Terraform ma ponad stu dostawców dla różnych technologii, a każdy z nich zapewnia użytkownikowi terraform dostęp do swoich zasobów. Dzięki dostawcy AWS, na przykład, masz dostęp do setek zasobów AWS, takich jak instancje EC2, użytkownicy AWS itp. Dzięki dostawcy Kubernetes masz dostęp do towarów, zasobów, takich jak usługi i wdrożenia oraz przestrzenie nazw itp.
W ten sposób działa Terraform i w ten sposób stara się pomóc w aprowizacji i objęciu pełnej konfiguracji aplikacji, od infrastruktury do aplikacji.
Zróbmy kilka praktycznych rzeczy. 👨💻
Zainstalujemy Terraform na Ubuntu i udostępnimy bardzo podstawową infrastrukturę.
Zainstaluj Terraform
Pobierz najnowszy pakiet Terraform.
Zapoznaj się z oficjalna strona pobierania aby uzyskać najnowszą wersję dla odpowiedniego systemu operacyjnego.
[email protected]:~$ wget https://releases.hashicorp.com/terraform/0.13.0/terraform_0.13.0_linux_amd64.zip
--2020-08-14 16:55:38--
https://releases.hashicorp.com/terraform/0.13.0/terraform_0.13.0_linux_amd64.zip
Resolving releases.hashicorp.com (releases.hashicorp.com)... 151.101.153.183, 2a04:4e42:24::439
Connecting to releases.hashicorp.com (releases.hashicorp.com)|151.101.153.183|:443... connected.
HTTP request sent, awaiting response... 200 OK
Length: 34851622 (33M) [application/zip]
Saving to: ‘terraform_0.13.0_linux_amd64.zip’

terraform_0.13.0_linux_amd64.zip
100%[=================================================================>] 33.24M
90.3KB/s in 5m 28s

2020-08-14 17:01:06 (104 KB/s) - ‘terraform_0.13.0_linux_amd64.zip’ saved [34851622/34851622]
Wyodrębnij pobrany pakiet.
[email protected]:~$ unzip terraform_0.13.0_linux_amd64.zip
Archive:
terraform_0.13.0_linux_amd64.zip
inflating: terraform
Przenieś plik wykonywalny Terraform na ścieżkę pokazaną poniżej. Sprawdź wersję Terraform.
[email protected]:~$ sudo mv terraform /usr/local/bin/
[sudo] password for newsblog.pl:
[email protected]:~$ terraform -v
Terraform v0.13.0
Widać, że są to polecenia dostępne w terraform do wykonania.
[email protected]:~$ terraform
Usage: terraform [-version] [-help] <command> [args]

The available commands for execution are listed below.
The most common, useful commands are shown first, followed by
less common or more advanced commands. If you're just getting
started with Terraform, stick with the common commands. For the
other commands, please read the help and docs before usage.

Common commands:
apply Builds or changes infrastructure
console Interactive console for Terraform interpolations
destroy Destroy Terraform-managed infrastructure
env Workspace management
fmt Rewrites config files to canonical format
get Download and install modules for the configuration
graph Create a visual graph of Terraform resources
import Import existing infrastructure into Terraform
init Initialize a Terraform working directory
login Obtain and save credentials for a remote host
logout Remove locally-stored credentials for a remote host
output Read an output from a state file
plan Generate and show an execution plan
providers Prints a tree of the providers used in the configuration
refresh Update local state file against real resources
show Inspect Terraform state or plan
taint Manually mark a resource for recreation
untaint Manually unmark a resource as tainted
validate Validates the Terraform files
version Prints the Terraform version
workspace Workspace management

All other commands:
0.12upgrade Rewrites pre-0.12 module source code for v0.12
0.13upgrade Rewrites pre-0.13 module source code for v0.13
debug Debug output management (experimental)
force-unlock Manually unlock the terraform state
push Obsolete command for Terraform Enterprise legacy (v1)
state Advanced state management
Udostępnianie instancji AWS EC2 za pomocą Terraform
W tym demo zamierzam uruchomić nową instancję AWS EC2 przy użyciu Terraform.
Utwórz katalog roboczy dla tego demo Terraform.
[email protected]:~$ mkdir terraform_demo
Przejdź do katalogu i utwórz plik konfiguracyjny terraform, w którym zdefiniujesz dostawcę i zasoby do uruchomienia instancji AWS EC2.
[email protected]:~$ cd terraform_demo/
[email protected]:~/terraform_demo$ gedit awsec2.tf

provider "aws" {
access_key = "B5KG6Fe5GUKIATUF5UD"
secret_key = "R4gb65y56GBF6765ejYSJA4YtaZ+T6GY7H"
region = "us-west-2"
}

resource "aws_instance" "terraform_demo" {
ami = "ami-0a634ae95e11c6f91"
instance_type = "t2.micro"
}
Uwaga: zmieniłem klucze dostępu i tajne 😛, musisz użyć własnych.
Z powyższej konfiguracji widać, że wspominam o dostawcy, takim jak AWS. Wewnątrz dostawcy podaję dane uwierzytelniające użytkownika AWS i regiony, w których instancja musi zostać uruchomiona.
W zasobach podaję szczegóły AMI dotyczące Ubuntu (ami-0a634ae95e11c6f91) i wspominam, że typ instancji powinien być t2.micro
Możesz zobaczyć, jak łatwy i czytelny jest plik konfiguracyjny, nawet jeśli nie jesteś zagorzałym programistą.
terraformowanie
Teraz pierwszym krokiem jest zainicjowanie terraformu.
[email protected]:~/terraform_demo$ terraform init

Initializing the backend...

Initializing provider plugins...
- Using previously-installed hashicorp/aws v3.2.0

The following providers do not have any version constraints in configuration,
so the latest version was installed.

To prevent automatic upgrades to new major versions that may contain breaking
changes, we recommend adding version constraints in a required_providers block
in your configuration, with the constraint strings suggested below.

* hashicorp/aws: version = "~> 3.2.0"

Terraform has been successfully initialized!

You may now begin working with Terraform. Try running "terraform plan" to see
any changes that are required for your infrastructure. All Terraform commands
should now work.

If you ever set or change modules or backend configuration for Terraform,
rerun this command to reinitialize your working directory. If you forget, other
commands will detect it and remind you to do so if necessary.
plan terraformowania
Następny jest etap planu; utworzy wykres wykonania do tworzenia i udostępniania infrastruktury.
[email protected]:~/terraform_demo$ terraform plan
Refreshing Terraform state in-memory prior to plan...
The refreshed state will be used to calculate this plan, but will not be
persisted to local or remote state storage.

------------------------------------------------------------------------

An execution plan has been generated and is shown below.
Resource actions are indicated with the following symbols:
+ create

Terraform will perform the following actions:

# aws_instance.terraform_demo will be created
+ resource "aws_instance" "terraform_demo" {
+ ami = "ami-0a634ae95e11c6f91"
+ arn = (known after apply)
+ associate_public_ip_address = (known after apply)
+ availability_zone = (known after apply)
+ cpu_core_count = (known after apply)
+ cpu_threads_per_core = (known after apply)
+ get_password_data = false
+ host_id = (known after apply)
+ id = (known after apply)
+ instance_state = (known after apply)
+ instance_type = "t2.micro"
+ ipv6_address_count = (known after apply)
+ ipv6_addresses = (known after apply)
+ key_name = (known after apply)
+ outpost_arn = (known after apply)
+ password_data = (known after apply)
+ placement_group = (known after apply)
+ primary_network_interface_id = (known after apply)
+ private_dns = (known after apply)
+ private_ip = (known after apply)
+ public_dns = (known after apply)
+ public_ip = (known after apply)
+ secondary_private_ips = (known after apply)
+ security_groups = (known after apply)
+ source_dest_check = true
+ subnet_id = (known after apply)
+ tenancy = (known after apply)
+ volume_tags = (known after apply)
+ vpc_security_group_ids = (known after apply)

+ ebs_block_device {
+ delete_on_termination = (known after apply)
+ device_name = (known after apply)
+ encrypted = (known after apply)
+ iops = (known after apply)
+ kms_key_id = (known after apply)
+ snapshot_id = (known after apply)
+ volume_id = (known after apply)
+ volume_size = (known after apply)
+ volume_type = (known after apply)
}

+ ephemeral_block_device {
+ device_name = (known after apply)
+ no_device = (known after apply)
+ virtual_name = (known after apply)
}

+ metadata_options {
+ http_endpoint = (known after apply)
+ http_put_response_hop_limit = (known after apply)
+ http_tokens = (known after apply)
}

+ network_interface {
+ delete_on_termination = (known after apply)
+ device_index = (known after apply)
+ network_interface_id = (known after apply)
}

+ root_block_device {
+ delete_on_termination = (known after apply)
+ device_name = (known after apply)
+ encrypted = (known after apply)
+ iops = (known after apply)
+ kms_key_id = (known after apply)
+ volume_id = (known after apply)
+ volume_size = (known after apply)
+ volume_type = (known after apply)
}
}

Plan: 1 to add, 0 to change, 0 to destroy.

------------------------------------------------------------------------

Note: You didn't specify an "-out" parameter to save this plan, so Terraform
can't guarantee that exactly these actions will be performed if
"terraform apply" is subsequently run.
zastosowanie terraform
Etap wprowadzania spowoduje uruchomienie pliku konfiguracyjnego i uruchomienie instancji AWS EC2. Po uruchomieniu polecenia Zastosuj, zostaniesz zapytany: „Czy chcesz wykonać te czynności?”, musisz wpisać tak i nacisnąć Enter.
[email protected]:~/terraform_demo$ terraform apply

An execution plan has been generated and is shown below.
Resource actions are indicated with the following symbols:
+ create

Terraform will perform the following actions:

# aws_instance.terraform_demo will be created
+ resource "aws_instance" "terraform_demo" {
+ ami = "ami-0a634ae95e11c6f91"
+ arn = (known after apply)
+ associate_public_ip_address = (known after apply)
+ availability_zone = (known after apply)
+ cpu_core_count = (known after apply)
+ cpu_threads_per_core = (known after apply)
+ get_password_data = false
+ host_id = (known after apply)
+ id = (known after apply)
+ instance_state = (known after apply)
+ instance_type = "t2.micro"
+ ipv6_address_count = (known after apply)
+ ipv6_addresses = (known after apply)
+ key_name = (known after apply)
+ outpost_arn = (known after apply)
+ password_data = (known after apply)
+ placement_group = (known after apply)
+ primary_network_interface_id = (known after apply)
+ private_dns = (known after apply)
+ private_ip = (known after apply)
+ public_dns = (known after apply)
+ public_ip = (known after apply)
+ secondary_private_ips = (known after apply)
+ security_groups = (known after apply)
+ source_dest_check = true
+ subnet_id = (known after apply)
+ tenancy = (known after apply)
+ volume_tags = (known after apply)
+ vpc_security_group_ids = (known after apply)

+ ebs_block_device {
+ delete_on_termination = (known after apply)
+ device_name = (known after apply)
+ encrypted = (known after apply)
+ iops = (known after apply)
+ kms_key_id = (known after apply)
+ snapshot_id = (known after apply)
+ volume_id = (known after apply)
+ volume_size = (known after apply)
+ volume_type = (known after apply)
}

+ ephemeral_block_device {
+ device_name = (known after apply)
+ no_device = (known after apply)
+ virtual_name = (known after apply)
}

+ metadata_options {
+ http_endpoint = (known after apply)
+ http_put_response_hop_limit = (known after apply)
+ http_tokens = (known after apply)
}

+ network_interface {
+ delete_on_termination = (known after apply)
+ device_index = (known after apply)
+ network_interface_id = (known after apply)
}

+ root_block_device {
+ delete_on_termination = (known after apply)
+ device_name = (known after apply)
+ encrypted = (known after apply)
+ iops = (known after apply)
+ kms_key_id = (known after apply)
+ volume_id = (known after apply)
+ volume_size = (known after apply)
+ volume_type = (known after apply)
}
}

Plan: 1 to add, 0 to change, 0 to destroy.

Do you want to perform these actions?
Terraform will perform the actions described above.
Only 'yes' will be accepted to approve.

Enter a value: yes

aws_instance.terraform_demo: Creating...
aws_instance.terraform_demo: Still creating... [10s elapsed]
aws_instance.terraform_demo: Still creating... [20s elapsed]
aws_instance.terraform_demo: Still creating... [30s elapsed]
aws_instance.terraform_demo: Still creating... [40s elapsed]
aws_instance.terraform_demo: Creation complete after 44s [id=i-0eec33286ea4b0740]

Apply complete! Resources: 1 added, 0 changed, 0 destroyed.
Przejdź do pulpitu nawigacyjnego AWS EC2, a zobaczysz, że została utworzona nowa instancja z identyfikatorem instancji wymienionym na końcu polecenia Apply.
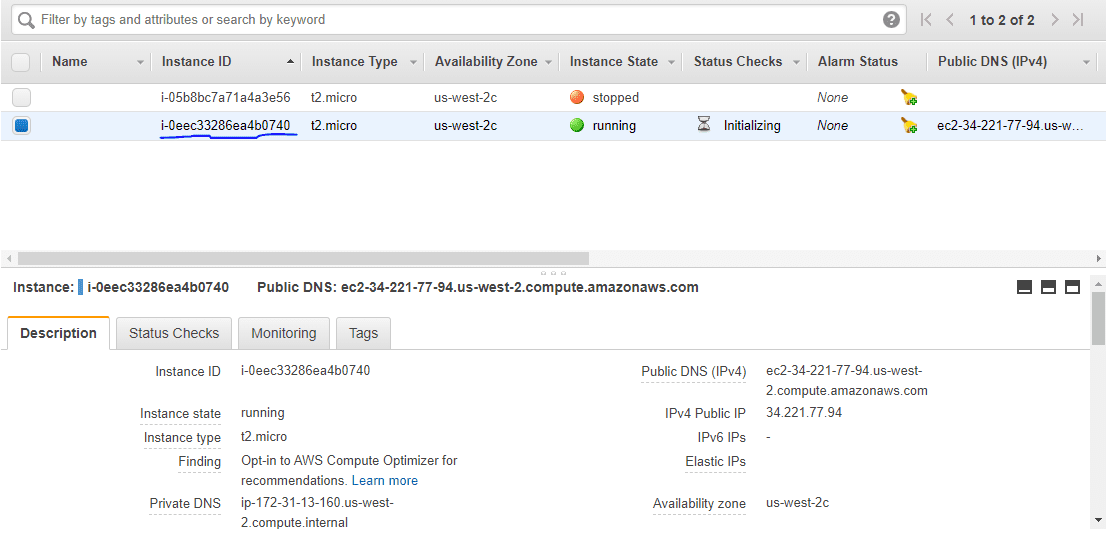
Pomyślnie uruchomiłeś instancję AWS EC2 za pomocą Terraform.
zniszczenie terraformu
Na koniec, jeśli chcesz usunąć infrastrukturę, musisz uruchomić polecenie zniszcz.
[email protected]:~/terraform_demo$ terraform destroy
aws_instance.terraform_demo: Refreshing state... [id=i-0eec33286ea4b0740]

An execution plan has been generated and is shown below.
Resource actions are indicated with the following symbols:
- destroy

Terraform will perform the following actions:

# aws_instance.terraform_demo will be destroyed
- resource "aws_instance" "terraform_demo" {
- ami = "ami-0a634ae95e11c6f91" -> null
- arn = "arn:aws:ec2:us-west-2:259212389929:instance/i-0eec33286ea4b0740" -> null
- associate_public_ip_address = true -> null
- availability_zone = "us-west-2c" -> null
- cpu_core_count = 1 -> null
- cpu_threads_per_core = 1 -> null
- disable_api_termination = false -> null
- ebs_optimized = false -> null
- get_password_data = false -> null
- hibernation = false -> null
- id = "i-0eec33286ea4b0740" -> null
- instance_state = "running" -> null
- instance_type = "t2.micro" -> null
- ipv6_address_count = 0 -> null
- ipv6_addresses = [] -> null
- monitoring = false -> null
- primary_network_interface_id = "eni-02a46f2802fd15634" -> null
- private_dns = "ip-172-31-13-160.us-west-2.compute.internal" -> null
- private_ip = "172.31.13.160" -> null
- public_dns = "ec2-34-221-77-94.us-west-2.compute.amazonaws.com" -> null
- public_ip = "34.221.77.94" -> null
- secondary_private_ips = [] -> null
- security_groups = [
- "default",
] -> null
- source_dest_check = true -> null
- subnet_id = "subnet-5551200c" -> null
- tags = {} -> null
- tenancy = "default" -> null
- volume_tags = {} -> null
- vpc_security_group_ids = [
- "sg-b5b480d1",
] -> null

- credit_specification {
- cpu_credits = "standard" -> null
}

- metadata_options {
- http_endpoint = "enabled" -> null
- http_put_response_hop_limit = 1 -> null
- http_tokens = "optional" -> null
}

- root_block_device {
- delete_on_termination = true -> null
- device_name = "/dev/sda1" -> null
- encrypted = false -> null
- iops = 100 -> null
- volume_id = "vol-0be2673afff6b1a86" -> null
- volume_size = 8 -> null
- volume_type = "gp2" -> null
}
}

Plan: 0 to add, 0 to change, 1 to destroy.

Do you really want to destroy all resources?
Terraform will destroy all your managed infrastructure, as shown above.
There is no undo. Only 'yes' will be accepted to confirm.

Enter a value: yes

aws_instance.terraform_demo: Destroying... [id=i-0eec33286ea4b0740]
aws_instance.terraform_demo: Still destroying... [id=i-0eec33286ea4b0740, 10s elapsed]
aws_instance.terraform_demo: Still destroying... [id=i-0eec33286ea4b0740, 20s elapsed]
aws_instance.terraform_demo: Still destroying... [id=i-0eec33286ea4b0740, 30s elapsed]
aws_instance.terraform_demo: Destruction complete after 34s

Destroy complete! Resources: 1 destroyed.
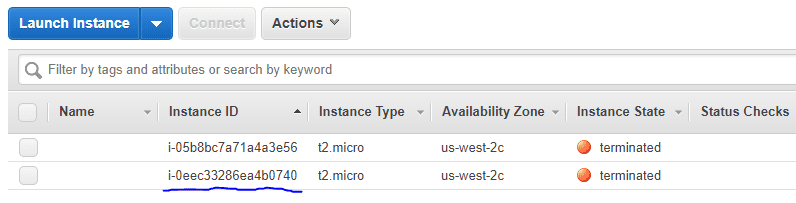
Jeśli ponownie sprawdzisz panel EC2, zobaczysz, że instancja została zakończona.
Wniosek
Uważam, że powyższe daje pomysł na rozpoczęcie pracy z Terraformem. Śmiało wypróbuj przykład, który właśnie pokazałem.
Powinieneś również sprawdzić te oprogramowanie do automatyzacji infrastruktury.
Jeśli chcesz dowiedzieć się więcej, sugeruję sprawdzenie Nauka DevOps z kursem Terraform.